Showing posts with label Scrapbooking Layouts. Show all posts

Monday, 31 December 2012

Its a Mash Up ! & a sMASHing MEGA New Years offer !!!

Happy New Years Eve !  I hope 2013 will be everything you wish for – and more !
Talking of the start of 2013 means only one thing in the Stampin Up! world – the start of Sale-a-Bration, which this year starts on the 22nd January !  As Stampin Up! is celebrating their 25th Anniversary this year, then you can be assured that this years Sale-a-Bration is the best EVER !  You will seriously NOT be disappointed – so if you have Christmas money left, then save it until the 22nd January !!
Just to give you a little taster of what is ahead in 2013, I have made another little video for you …… this is my “Mash Up” Scrapbooking Kit and SAB sneaky peak !
Its a Mash Up!
I will be offering a monthly “Mash Up” Scrapbooking Kit starting in January.  You will receive two of these divided pages each month together with scrapbook papers, cardstock, journalling tags, embellishments etc., , so that over a 10 month period, you will be able to complete an album.  Each month I will be showing you 2 completed pages, but you will receive enough products to complete at least 2 x DOUBLE SIDED pages (four pages total).  I have a dedicated customer only page on my blog (password protected), where I will upload a video each month, and instructions on how to complete your pages.
sMASHing OFFER – If you sign up or commit to the “Mash Up" kit for 10 months, then at the end of the 10 month period,  you will receive a 12” Linen Ring Album for FREE ! (only if you sign up before the 7 January).
DETAILS – The cost per month is £15 (plus £2.50 postage), ETA:  Kit is now £10 plus postage and you will receive everything mentioned above.  If you are interested in committing to the kit, then please contact me on carole.bryson@gmail.com or 07747 465186.  If you wish to pay by paypal, then please send me your paypal email address, so that I can invoice you each month, together with your name, address and contact phone number.  If you wish to pay by standing order/bank transfer, then please let me know in your email or text, and I will let you have the details.
(I will be able to accept credit/debit card payments shortly – but I will keep you updated on this).
So there you go …. lots to look ahead to … but I will leave you with another, little Sale-a-Bration sneaky peak …
card4
As always, if you have any questions or queries, please contact me on carole.bryson@gmail.com or 07747 465186
Happy New Year to you all !   Cal xxx

Wednesday, 5 December 2012

Tell ‘em what you want, what you really, really want !

How to get what you want this Christmas!

Subtlety will get you nowhere.  Share your favourite things from Stampin Up! by sending your gift list straight to the inbox of anyone who owes you an amazing present this Christmas.

Fill in this Wish List including my details, and then send it off  to anyone and everyone !   I will do the rest !

What more could you, or your gift givers want ??

Wish List picture

My contact details are, carole.bryson@gmail.com or text/call me on 07747 465186

My Favourite Things

Talking of Christmas, here is a list of 10 of my most favourite things – seriously, I’d be happy with anything off of this list, but I will love you forever if you send me David Beckham !

favourite things 1

This layout was made using Storytime papers, SU! chipboard alphabet, Apothecary Accents journalling dies and lots of ink !

Continuing with Christmas ….

card1

This is another of the ‘small but quick’ Christmas cards that I have made with matching envelopes using the fabby diagonal scoring plate.

As always, if you have any questions or queries, please contact me on carole.bryson@gmail.com or 07747 465186

DON’T FORGET THOSE WISH LISTS !   Happy Crafting ! 

Tuesday, 25 September 2012

Awesome Autumn !

Don’t you just love the Autumn ….. all the colours of the season continually changing, the cold nights snuggled up under a blanket and sipping hot chocolate …. well hot coffee in my case as I hate hot chocolate – yeuch yeuch !

Orchard harvest 2

This layout was again (sorry) made using the fantastic Orchard Harvest designer papers.  These papers are just tooooooo useable !  I’m on my second packet of these papers already !!!

This is a really easy layout to make, and I’ve kept it pretty simple so that it can be used for both new scrappers and old alike.    More experienced scrappers could add spritzing, painting and more embellishments to ‘dress it up’ even more.

Instructions

  1. Cut strips of paper measuring 1” x 10” and 11/4” x 10”
  2. Distress all the edges of the strips of paper using either the distressing tool on the Stampin Up! cutter kit, or using a pair of scissors.  Then ink all the edges using Early Espresso inkpad and dauber.
  3. Distress the edges of the background paper using the same technique as above.
  4. Adhere the strips of paper as shown
  5. Adhere the photo to a piece of Rich Razzleberry cardstock leaving a 1/14” edge all around the photograph
  6. Using one of the NEW large jumbo sticky rounds (only available in the Autumn/Winter catty) and some Crumb Cake tulle, tie a knot in the end o f the tulle and keep wrapping the tulle around the knot – twisting the tulle as you keep turning.
  7. Adhere the tulle circle as shown, and then add a tulle bow (finished with an antique brad)
  8. Add title and journalling as shown

Voila ! How easy ?!!!!!

As always, if you would like to place an order, or if you have any questions or queries, then please contact me on carole.bryson@gmail.com or 01706 351299/07765 847062

DON’T FORGET – YOU HAVE ONLY 5 DAYS TO ORDER FROM THE CURRENT 2012 CATALOGUE !!!!

Saturday, 23 June 2012

I have done a little scrapping ….

Stewart was feeling a lot better today, so I decided that I’d get a little bit of scrapping done ….
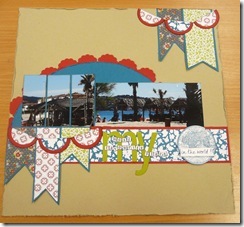
23 June 2

The first layout, “My most favourite place in the World”, shows the Chicken Shack on Port Grimaud beach in the South of France – it truly is the most amazing place, that serves amazing food, amazing cocktails and looks directly out at St Tropez Bay.  Its heaven on earth !

Instructions

I’ve used a 12x12 Crumb Cake cardstock base.

1)  The first thing I made were the tags on the top right of the page.  They were made by cutting out 1 -  2”x4” and 1 -  2”x 3” mats from Island Indigo card.  I then cut out two different pieces of designer paper from Twitterpated measuring 1 3/4” x 3 3/4” and 1 3/4” x 2 3/4” which I then layered onto the tags, and cut out the bottom ‘tails’.  I then punched out two circles of designer paper using the 1 3/8” punch.  I then punched out another 2 circles in real red cardstock using the 1 3/4” punch.  I adhered the paper onto the card, and then cut the circles in half.   I adhered the long mats onto the layout first, and then adhered the half circles over the top.

2)  Next I cut out a strip of real red cardstock measuring 2” x 12”, and a strip of designer paper measuring 1 3/4” x 11 3/4” which I adhered onto the red cardstock.  Put this strip aside.

3)  The next thing I made was the large HALF of a circle.   I lay a dinner plate on top of a piece of Indigo Island cardstock and drew around it in pencil.  Remember, you don’t need to draw the whole circle, because you will only be using half of it !   Next, I punched out 7 scalloped circles in real red cardstock using the  1/14”  scallop circle punch.  This isn’t available in the UK catalogue now, so you can either use another brand of punch, or a spellbinder die.   I then cut the scallops into half, and adhered around the edge of the half circle.  I then adhered this to the layout, and adhered the long strip over the bottom edge of the half circle. OR – you can use the ‘regular’ size scallop punch, but just have fewer circles Smile

4)  Next I made three more ‘tailed tags’. Again, I used Island Indigo for the bottom layer – for these, I used different sizes of card and patterned paper, and you can cut yours to any size you like.  One was 1 3/4” x 3”, the middle one was 1 7/8 x 4 1/4” and the last one on the right measures 1 7/8” x 2 5/8.  I cut the patterned paper 1/4” smaller than the cardstock.  As I say, just go with your ‘eye’ and see what size you prefer, or what you think looks best.  I adhered the tags to the top of the strip, and then adhered more half circles of cardstock and patterned paper over the three ‘tailed tags’.

5)  Next, I added the photographs.  As you can see, the photograph on the left has been trimmed down, and then cut into three – I know some people are horror stricken to be asked to cut photographs, but I think it can give a really different effect to your layouts.  I trimmed down the second photograph and then adhered it to the right of the first photograph.  TIP:  I always ink the edges of my photographs with Early Espresso, as it eliminates those awful ‘white’ lines around the edges, particularly if you have trimmed your photos.

6)  To add some elements to the layout,  I stamped the atlas from The Open Sea using Island Indigo ink on white cardstock.  I punched it out, added the words ‘in the world’ and stuck it onto the long strip using dimensionals.   Lastly, I die-cut the word ‘my’ using Lucky Limeade cardstock, and added the remainder of the title.  The little letters I use can be bought – however, I have typed up two sizes of alphabets in Word, and print them onto cardstock.  I ink the edges before placing them where I want them.

Voila !

STEP-UP  - you could step this layout up, by using buttons, pearls, rhinestones etc., I wanted to keep this pretty plain, as I felt that the amazing patterned papers were enough in this instance, and show them off to their full potential.

I hope you enjoyed this tutorial, and I would love to see any projects you make that use mine as your inspiration.  As always, I’d be grateful if you would give me credit if you ‘lift’ this project.

Have fun and don’t forget to come back for more ideas and inspiration.  I am still working on getting a video onto my blog, but its a nightmare !

Come back in the next few days for instructions on the following layouts ….
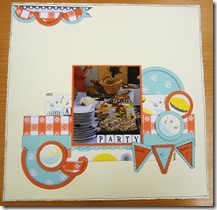
23 June 1 23 June 3

If you would like to place an order, or if you have any questions, then please contact me on carole.bryson@gmail.com or call me on 01706 351299

Sunday, 17 June 2012

Scrapping in the Attic–huh ?

Hi Scrappers !  I’m not scrapping in the attic – well not yet anyway, but I AM using the fantastic Stampin Up! Attic Boutique papers.  Whether you are making male or female themed layouts, these papers are perfect for both, and in my next post, I’ll show you a couple of layouts that I designed for the men in our lives.
To start with though – here are the first two layouts.
Attic boutique1Attic boutique section 1Attic boutique section 3
attic boutique section 4attic boutique section 2
Instructions
I have tried to upload a You Tube video explaining how I did the ‘burnt’ effect around the edges, but I’m doing loads wrong – I WILL work it out – I promise !
1) To achieve the burnt look around the edges, you firstly need to ‘distress’ the edges either with a Stampin Up distress tool, or one of the ‘arms’ on a pair of scissors.  If using scissors, lightly drag the scissors down the page. Don’t worry if the page rips or tears, it really does improve the effect !
2) Next, I took a crumb cake ink pad and dauber, and literally swept around all of the edges in a circular motion.  I took the ink approx 1” into the papers.  I then used Sahara Sand and repeat the procedure, but only took the ink into about half an inch. I then used Early Espresso, and did the same thing again.  Make sure that you blend all the colours together.  Finally, and this is the important bit – run a black ink pad around the edges only of the paper. 
3) As you can see from the above photographs, I have cut out sections of the main background paper.  I used a craft knife and glass place mat to carefully, ‘cut’ out the sections that I wanted.  I then slipped the photograph under the cut outs.
4) I cut out the elements you can see from some of the other papers in this set, and adhered them at varying heights and levels using foam pads.
5) The blue journalling block is cut out using Stampin Up framelets dies, and enhanced using a black journalling pen.
6) Finally, I rolled the top right hand corner over a pencil, inked it, and then added a small cut out square to the back of the rolled section – this gives a sort of ‘peeled’ effect.
2nd Layout
attic boutique 2 layout wholeattic boutique 2 layout section 1attic boutique 2 layout section 2attic boutique 2 layout section 3attic boutique 3 layout section 2
Instructions
As per the above layout, I have distressed the edges using the Stampin Up! distressing tool.  However, rather than heavily distress the edges with inks, I have literally just swiped the ink pad down the edges.
2) Using the designer papers with the ‘pen’ design on, I cut out heaps of the pens, and arranged them over the photograph mat until I was happy with their position.  Again, I used a combination of foam pads to product different heights and layers.
3) Using a different sheet of paper, I could out three of the ‘basques’.  I inked the edges, added Stampin Up pearls, and then layered them onto the page.
4) I cut out a photo corner, inked it, and added an embossed butterfly with pearls forming the body of the butterfly.  I adhered this to the layout.
5) Once again, I cut out the flourish from some of the designer papers in this series, and adhered them onto the page using tombow glue AND more dimensionals (foam pads).
6) Using Daffodil Delight cardstock, Apothecary Art stamp set and the new SU framelits,  I cut out the main Title frame.  I added more journalling by cutting out strips of vanilla cardstock in different sizes.
As always, if you take inspiration from either of these layouts, I would be grateful if you would give me recognition.
If you would like to order any of the supplies used in the above layouts, please email me on carole.bryson@gmail.com or text me on 07765 847062

Sunday, 12 February 2012

Scrapbooking Bundle

Here is an amazing value Scrapbooking Bundle offered by me.  For £45 (plus postage)  You will receive everything you see below to make heaps MORE than the two layouts shown, PLUS a FREE sale-a-bration stamp set or scrapbook papers !
tags and tickets 1
tags and tickets 2
The two layouts are made completely with the bundle, and I have stack loads left to make at least another 6+ layouts AND cards etc.,
For £45 you will receive the following FULL packets:-
122373L  1 3 8 circle punch
baja breeze seam binding ribbonbrads silverdimensionals
PLUS …. a FREE stamp set or scrapbooking papers from the Sale-a-Bration leaflet !!!
For more information, or to place your order, please contact me on carole.bryson@gmail.com or 07799 250981.
Happy Crafting !

LinkWithin

Related Posts Plugin for WordPress, Blogger...